Welcome to our Support Portal. Search for answers using the search box below, or create a support ticket if you cannot find your answer.
Advanced Roster Features


You will then be presented with the “Template Management” screen which shows the following information:
– The template names
– The template period (weekly or fortnightly)
– The template period start date
o Clicking on the date will open that roster period in another window or tab
– The number of shifts contained within the template period

A roster template is simply a reference to an existing roster week or fortnight and all of the shifts contained therein. Below are the instructions to create a template reference:
- Access the “Roster Template Management” view
- Click the “Create Reference Period” button at the top right of the list view
- Set a template name
- Select the period the template should reference (Week or Fortnight)
- Select the start date of the template

- Click “Create”
Start dates will be automatically adjusted to match Flowlogic’s roster weekday start configuration setting.
Deleting a
template is as straightforward as creating one. To delete a template, you will
need to do the following:
Access the “Roster Template Management” view
Locate the template you would like to delete within the template list
Click on the dropdown arrow next to the “Edit” button
Click Delete

Please note:
– The template reference will be deleted immediately (you will not be prompted to confirm this action.
– Deleting a template will not delete roster shifts. Templates are simply a named link to a roster week or fortnight
Schedules allow you to create alternate, refined roster views. Clicking the “Schedules” button in the roster administration menu will take you to the “Schedule Management” section. Here we can see existing schedules which can have their name edited or you can delete the schedule. In here we can also create a new schedule.

To delete a schedule simply toggle “Deleted”. This will not completely delete the schedule and will let you reinstate the schedule if “Deleted” is toggled back to off.

To create a “Schedule”, click the “Create Schedule” button. This will present you with a pop-up window for you to enter the name of the schedule.

To add a shift to a schedule, open the shift you would like to add to a schedule and then select the schedule from the “Schedule” field.

Within Flowlogic we can nominate public holidays, this will only affect staff pay and will have no affect on the billables for the shift. Public holidays can be applied two ways, the first being through the roster admin menu or through the shift itself (covered in the “Shift Creation” section of this guide.) These holidays will not carry forward to the next year so they
will need to be created for each year. Public holidays can be set up for how ever many years in advance you would like.
Clicking “Public Holidays” within the roster administration menu will take you to the “Roster Public Holidays Management” section. In here we can add, remove, or update public holidays.

To remove a public holiday from the system, simply click the “Remove” button and then click the “Save Changes” button.
To add a public holiday, you can click the 1, 2 or, 5 button in the top right of your screen. Clicking these will create either 1, 2 or, 5 public holidays. Once you have clicked the add button, you can then set the date for the public holiday, give it a name, and assign a region if required.
If there are public holidays that only apply to certain regions within your company (e.g. if you provide services across two states however only one state recognises that holiday) you can select the region that the public holiday is applied to. This will apply to the region the staff record is located in and will not apply to the region the shift is located in.


In this view you can go directly to the staff record by clicking the page icon. You can also view the “Agenda” for the staff member which provides you with a calendar style view of the shifts for them. This has a few different view options which can be changed by using the buttons at the top right. The agenda can also be downloaded as a PDF if required.

By clicking on the staff’s name in the main roster view, you will be taken to their roster resource details page. Within this page you will find the following:
Details Page
This is a summary of their record details and their hourly rate (cost category.)

Staff Availability
The staff’s availability which was set in their user profile will be displayed here and can also be edited from within here. Please see the “User Account” section of the guide for more information on availability.

Client and Staff Suitability
In this section you can set which clients the staff member can work with, as well as their level of suitability. The different suitability levels are:
Preferred – The staff member is a preferred worker for the client.
Acceptable – The staff member has worked with the client / is allowed to work with the client.
None – The staff member has not worked with the client before
Disallowed – The staff member should not be rostered with the client.
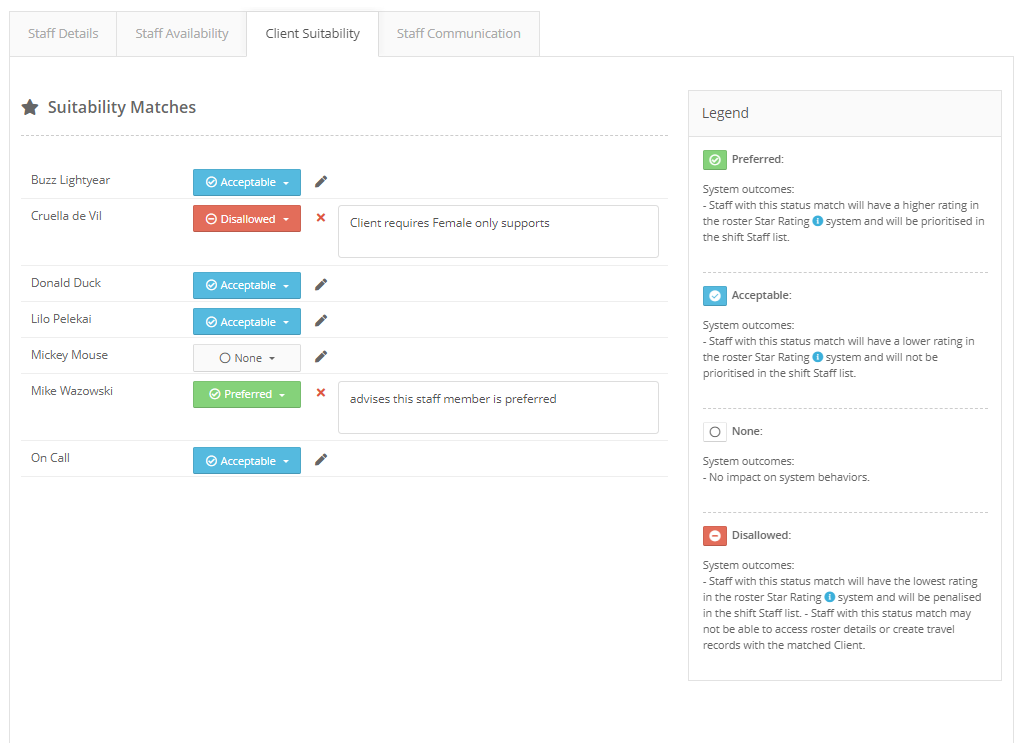
If a staff member is set to “Preferred” they will be ranked higher on the staff list when creating a shift with that client. The suitability options are displayed with stars when creating a shift and look like this.
What is displayed in “Who’s Working” in Roster | Matching suitability rating |
Preferred | |
Suitable | |
Acceptable | |
Allowed | |
Disallowed |


Contracted Hours
In this section you can view, edit, add or remove a contract for the staff member. If a staff member has a contract created, you will see it at the bottom of the page with the ability to add a new contract at the top of the page.

This information can also be seen by clicking on the contracted hours on the main roster view.


Client Resources
Client resources will have a similar layout to the staff resources showing total rostered hours as well as contracted hours if that has been set up for the client. Just like the staff resource we can click on the client’s name for more information.
Upon clicking on the clients name you will be shown a summary of the basic details, just like the staff details. In this area we have additional tabs which include:
Roster of Care (RoC)
The RoC is an optional feature which behaves in a similar manner to the staff availability painter. With this tool you can paint the various support types a client may need to receive throughout the week / fortnight / month. These will then be shown when creating a shift for that client (explained further in the “Shift Creation” section of this guide.)
The support types and colours are customisable by your Data Captain.

Colour
In this area we can allocate a colour to a particular client. This will set the colour of each shift with this client to a particular colour. Please note that this will not update existing shifts and will only affect shifts created after setting the colour.

Contracted Hours
This section behaves exactly the same as the “Contracted Hours” section of the staff resource in that we can view, edit, remove or add contracts for that client. Contracts for clients can be utilized to ensure you are reaching the required hours of support.


Upon clicking the “Add Shift” button you will be taken to the shift creation page. It has been split into 5 sections with section four being an optional feature. For the activation of this or any other additional features within the roster please contact your Data Captain.

1. Shift Details
The shift details contains the key information about the shift which is broken down below.

Area – The area will pre-fill with the area the client’s record is stored in. You can override if the shift will be occurring
in a different area.
Status – The status of the shift is either published or unpublished. Published meaning the shift is visible to staff and unpublished meaning the shift is not visible to staff.
Completed – The completed status of a shift is as follows:
· Yes – The shift has been manually marked as complete and is ready for invoicing or claiming.
· Auto (no) – The shift is currently not completed however when a timesheet containing this shift is submitted this will change to “Auto (yes)” and the shift will then be ready for invoicing or claiming.
· No – The shift has been manually marked as not completed and will need to be manually marked as completed for the shift to be billed.
Cancelled – A shift can be marked as cancelled using the provided drop down. The options within the dropdown are shown below. If a shift is marked as “Cancelled – Short Notice” or “Cancelled – No Show” the system will bill the appropriate percentage for the shift as per the NDIS guidelines (if applicable).

Date – This is the date the shift will be occurring.
Time – This is the time the shift will be occurring. Below the times is the “Overnight” checkbox which when toggled, will tell the system the shift is going overnight and will put the end time on the next day. Next to that there is the “Awake Shift” checkbox which when ticked will treat the overnight as an awake shift meaning all of the hours for the shift are considered active and will prevent the system from paying a sleepover rate for the shift. Below the checkboxes there will also be a number telling you the working time for that shift.

Free / Busy – Changing a shift to “Free” will allow you to have multiple shifts with the same client or staff member without receiving any overlapping shifts warning.
Public Holiday – By clicking the plus button in the top right of the shift details you will be given a checkbox to mark an individual shift as a public holiday. This will force the shift to be paid at the public holiday rate for that staff member.
Shift Colour – By using this tool you can mark that single shift a particular colour. These colours can be given names and can be used to colour coordinate the roster based on support type or another identifier. These colours and the names (if applicable) are the same for every shift.
Shift Icon – This is a set list of icons which can be applied to a shift. They have no effect on anything within the system and are purely for your own reference. They can be utilized to indicate what will occur on shift.
Notes – These notes are for internal communications, e.g. telling the staff member on shift that the client needs to go to the doctor or would like to go to the beach.
Schedule – If you have schedules set up within your system this is where you would select the schedule the shift would reside in.
Additional Custom Fields – There are two additional fields which can be added upon request. These can either be a list of predefined options or a free text box. To enable these please contact your Data Captain.
2. Shift Availability Overview
The shift availability overview will compare the shift times (displayed as the grey stiped section), the clients RoC (if applicable) and, the staff members availability (if applicable). If a staff member has marked themselves as unavailable there will be a X in the result area of the overview, if the staff member is available this will display as a tick.

In the top right-hand corner of the overview there is a key
which provides information about the overview and the contents within it. There
is also a box which upon clicking will expand the overview to a larger size for
easier viewing.
3. Client List
This is where you can select the client(s) that are being rostered onto this shift. There is no limit on the number of clients which you can have on a shift.

Directly next to the client’s name (underlined in blue) is
the affinity tool. This may not be active in your system and is explained
further in the “Affinity” section of this guide.
Once a shift has been saved a purple shift note button will
appear next to the billables picker allowing staff to submit a shift note
through the roster.

Underlined in red is the billables picker which is utilized to apply one or more billing codes to that shift for that client. Depending on your system setup, billables may be required for a shift to be created (this is the most common behaviour.) If a shift is being created with a custom client resource (a client resource that does not have a client record attached) quite often a billing code is not required.

Upon clicking the dollar sign you will be presented with a pop-up window (displayed above) that is used to define the billables for that client on that shift. You will need to select a billing flag as this is used by the NDIS for bulk uploads.
Next to the billing flag is the billing code which once clicked will present you with either the entire service item list or a list of allocated items for that client.
Next is the quantity, this can be a time-based quantity or a decimal based quantity. When creating a shift the time of the shift will be the default time quantity when selecting billables however if the shift is edited in the future this value will need to be manually adjusted if required.
The last field in this window is an optional field and may or may not be active in your system. This is the ratio field which allows us to define a ratio for that shift e.g. one staff member to 2 clients, 2 staff members to 5 clients.


Upon editing or deleting an existing shift, the system will ask the user if the change is to be extended to all future shifts or applied only to the current shift. It is possible to extend these changes to all future “Odd” shifts as well. If the change is applied to the individual shift, the shift will be marked as “Odd”.
On the Update Repeated Shift window there may also be two checkboxes:
– Wish to update odd shifts
o When checked this will update all shifts including the shifts that are marked as “Odd”
– Update must ignore staff details
o When checked this will update all shifts including shifts in the repeat series that have different staff.
o When unchecked this will update all shifts excluding shifts in the repeat series that have different staff.
Note: Updating a repeated shift will only update shifts in the future. Any shifts in the past will remain the same.

Review/Inspect Repeat Chains:
From any shift that is in a repeat chain, click the “History” button at the bottom left of the screen.

On this page you will be shown the history of the shift which shows any changes done to that shift and the repeating chain which shows the other shifts that are in the chain, both past and future.
Roster shift history example:

Repeating chain example:

| Dashboard widget | Will be visible only to your admin team if they have been allocated the permissions – please contact your data captain should you require further information around this. |
| Roster overview panel (Located from the side panel within the roster). |  |

- Keep TBA at Top of sorting (yes or no).
- Sort order: which can be sorted by alphabetically, total hours, cancellation hours, leave hours, contract Delta.
- Show all staff or choose a specific person.
- Date: choose the daily, current or financial pay period (by date

Team Leader Information
– Displayed on your dashboard will be an overview of the staff members that have been assigned a shift, making it easy to keep track of which staff have completed their hours. An example of this is displayed below.

Filters
– Sort Order Keep TBA at top of sorting
– Show Only Managed Staff
– Date
Elements:
Card background colours:
White Background (None of the rules are in effect)
Green background (Current hours are between contracted and max allowed hours)
Red Background (Current rostered hours are less than the contracted hours)
Yellow Background (Total hours are greater than max allowed hours)