
Search for answers or browse our knowledge base.
Area Permissions
Key Points
-
Areas help organise records and control user access.
-
Areas can represent:
-
Physical locations
-
Departments
-
Service types
-
Funding streams
-
Regions or states
-
-
Users only see records within the areas they are assigned to.
-
Areas are a top-level access control tool.
-
Regions group multiple areas together.
-
Areas can also support rostering, messaging, and payroll functions.
What Are Areas?
Areas are used to:
-
Organise records
-
Control which users can access specific data
-
Structure your system by region or team
For example:
-
Queensland staff can see Queensland records
-
New South Wales staff can see NSW records
Areas help maintain privacy and clarity across large organisations.

Accessing Area Management
To manage Areas:
-
Go to the System Menu (top right-hand corner)
-
Select Areas
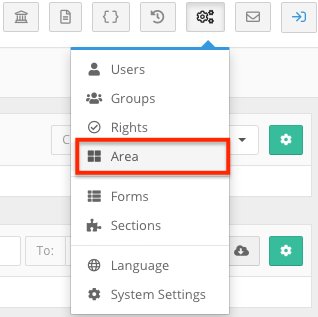
This opens the Site / Area Management page.
Here you can:
-
View existing areas
-
Create new areas
-
Edit existing areas
-
Create and manage regions
What Are Regions?
Regions are broader categories that group multiple areas.
They are mainly used to:
-
Categorise different site locations
-
Provide higher-level structure
To create a new region:
-
Click Add New Region
-
Enter the required details
-
Save
Regions help organise areas but do not directly control permissions.

Creating a New Area
Step 1 – Click Add New Area
Select Add New Area from the Area Management screen.
You will be taken to the Area Details page.

Step 2 – Enter Area Details
Complete the following fields:
-
Region – Select the appropriate region
-
Area Name – This appears on records
-
Description – Optional (can include address or details)
-
Virtual Area – Tick if not a physical location
-
Active / Archived – Areas can be deactivated if no longer needed
-
Messenger Recipient – Allows area to receive messages
-
Show/Hide Message Source – Control message visibility

Step 3 – Add Financial Codes (Optional)
You can also add:
-
Account Codes
-
Export Codes (e.g., for Xero integration)
 These assist with:
-
Timesheet exports
-
Invoice tracking
-
Financial reporting
Step 4 – Assign Users
Assign users to the area.
This determines who can access records within that area.
⚠ Important:
If a record is assigned to an area with no users assigned, no one will be able to see it.

Applying Areas to Records
After creating an area, you can:
-
Open a staff or participant record
-
Assign the record to the new area
-
Confirm visibility is working correctly

This ensures permissions are functioning as intended.
How Areas Can Be Structured
There is no single correct way to structure areas.
Common setups include:
-
By physical office location
-
By state or region
-
By department
-
By funding stream
-
By service type
The key is to:
-
Keep the structure simple
-
Stay consistent
-
Make it easy for staff to understand
Areas in Other Parts of FlowLogic
Areas are also used in:
Roster
-
Assign shifts by area

-
Apply public holidays to specific regions

Messaging
-
Control which site messages are sent to

Payroll & Finance
-
Support export codes and financial workflows

Site Management Overview
The Site Management tool allows you to:
-
Create Areas (Sites)
-
Edit Areas
-
Manage regions
-
Assign users
When creating an Area:
-
Select the region
-
Enter the site name
-
Decide if it is virtual or physical
-
Add description or address
-
Add export codes (if required)
-
Assign users
Sites can be:
-
Active
-
Archived (if no longer in use)
Best Practice Recommendation
While you can create as many areas and regions as needed, it’s often best to:
-
Keep the structure simple
-
Avoid over-complicating your setup
-
Use other permission tools where appropriate
Areas should primarily be used for high-level organisation and access control.
Outcome
You now understand:
✔ What Areas are and how they work
✔ How to create and manage Areas
✔ The purpose of Regions
✔ How to assign users to Areas
✔ How Areas impact permissions and visibility
✔ How Areas integrate with rostering and finance
Areas are a powerful way to organise your system, protect data, and ensure staff only access what is relevant to their role.
Key Points
-
Rights control what users can see and do in FlowLogic.
-
Groups bundle rights together for multiple users.
-
Rights are assigned to groups — not directly to individual users (in most cases).
-
A well-planned group structure improves security and efficiency.
-
The Rights List in the Online Guide explains each right in detail.
-
Fewer, well-designed groups are easier to manage long-term.
What Are Rights?
Rights act like keys that unlock specific parts of the system.
Each right controls access to a specific feature, such as:
-
Viewing the Roster Schedule
-
Creating or editing shifts
-
Accessing Reports
-
Managing the Drive
-
Editing documents
-
Using Risk Assessment tools
Rights are powerful and granular, meaning they control very specific actions.
Accessing Rights

To view Rights:
-
Go to the System Menu
-
Click Rights
Most users do not have access to this section.
This is intentional, as it is a powerful and complex area of the system.
If you are unsure about changing rights, speak with the FlowLogic onboarding team before making adjustments.
Using the Rights List
FlowLogic provides a detailed Rights List in the Online Guide.
What Are Groups?
Groups are collections of users who share the same rights.
Instead of assigning rights one user at a time, you:
-
Assign rights to a group
-
Add users to that group
This makes managing permissions much easier.
Accessing Groups
To manage Groups:
-
Go to the System Menu
-
Click Groups

You’ll see:
-
Group ID
-
Group name
-
Description

You can search or expand the list as needed.
Common Group Examples
Typical group structures may include:
-
Super Admin (FlowLogic team access)
-
FlowLogic Admin (internal system admins)
-
HR Admin
-
Roster Manager
-
Finance Admin
-
Team Leaders
-
Support Staff
Higher-level groups have broader rights, while operational groups have more restricted access.
Best Practice for Groups
When creating groups:
-
Plan your structure before creating many groups.
-
Avoid creating a separate group for every small role.
-
Combine roles where access requirements are similar.
-
Keep the number of groups manageable.
The more groups you create, the more maintenance is required.
Creating a New Group
Step 1 – Click Add New Group
From the Groups screen, select Add New Group.
Step 2 – Enter Group Details
Add:
-
Group name
-
Description
-
Messenger recipient option (if required)

Step 3 – Assign Users
To assign users:
-
Click their name to move them to the assigned list
-
Use arrows to move all users at once
-
Use the search bar to find specific staff
Click Save when finished.
Step 4 – Assign Rights (If Permitted)
If you have permission, you can assign rights directly to the group.

Editing a Group
1. System menu > Groups
2. Locate the group you wish to edit and click the Edit button to the right of the entry
3. In the group editor – which is similar to the group creator – you can change:
- Group Name/Description
- The users assigned the group
- The rights assigned to the group (and therefore assigned to all users who belong to the group)
4. Once finished, click the green Save button at the bottom of the page.
Testing Group Permissions
It’s strongly recommended to:
-
Add a staff member to the group
-
Log in as that user
-
Confirm what they can and cannot see
Testing ensures your permissions work as intended.
Managing Access Through Users
You can also review access from the Users screen.
Here you can see:
-
Which Groups a user belongs to
-
Which Areas they are assigned to
This makes it easy to:
-
Move a user to a new group
-
Adjust their access quickly
-
Review overall permissions without searching multiple groups
How Rights & Groups Connect to Other Permissions
Groups form the foundation for:
-
Section Permissions (access to sections like Participants or Staff)
-
Form Permissions (access to specific forms within sections)
Using groups properly ensures your section and form permissions remain clean and manageable.
How Rights and Groups Work Together
-
Rights define what actions are possible.
-
Groups bundle those rights for teams or roles.
-
Users are assigned to groups.
-
Areas control record visibility.
Together, they form FlowLogic’s permission structure.
Outcome
You now understand:
✔ What Rights are and how they function
✔ How to use the Rights List
✔ What Groups are and why they matter
✔ How to create and manage Groups
✔ How to assign users and test permissions
✔ How Rights and Groups work together
By planning your groups carefully and understanding rights thoroughly, you can create a permission structure that is secure, efficient, and easy to manage as your organisation grows.