Welcome to our Support Portal. Search for answers using the search box below, or create a support ticket if you cannot find your answer.
Leave Management Overview
Leave Management
FlowLogic allows staff to submit leave requests directly through the system. This article covers the full process — from creating a leave request as a staff member, through to reviewing, managing, and approving leave as an administrator.
Creating a Leave Request (Staff)
To submit a leave request, click your username in the top right corner and select Leave Requests. You will be taken to the My Leave Requests page, which shows any existing requests. Click Create Leave Request in the top right corner to begin a new one.
Select your Leave Type, Leave Area, and Leave Period. The options available will vary depending on your system configuration and permissions.
Partial Day
For a portion of a day (e.g. a doctor’s appointment). Requires a leave date, start time, and end time.
Single Day
For a single full day. Requires a leave date. Total rostered shift hours are calculated automatically after saving.
More Than a Day
For multiple days. Requires a start date, end date, and number of leave days (calculated automatically). Total rostered hours are calculated after saving.
Enter any notes relevant to your leave request. Depending on your system configuration, you may also be able to select an Approving Officer who will be notified when the request is submitted. This field may be optional or mandatory.
Once the form is complete, you have two options:
Save as Draft
Saves the request without submitting it, allowing you to return and make changes before sending it to the admin team.
Save & Close / Save & View
Submits the leave request to the administration team for review.
Once submitted, the administration team will review the request and respond with one of the following outcomes:
Approved
The leave has been reviewed, and there are no issues.
Declined
The leave was not approved. Contact your admin team for clarification.
Returned
Information is missing or incorrect. The request will be returned with a note. Correct and resubmit.
Accessing Leave Management (Administrators)
To access Leave Management, go to the Finance and Payroll tab and select Leave Management. This will open the main leave screen where all current and past leave requests are stored. You can return to this screen at any time to review or edit leave records.

Using Filters
At the top of the screen you will see a range of filters that allow you to search for leave records. The available filters include: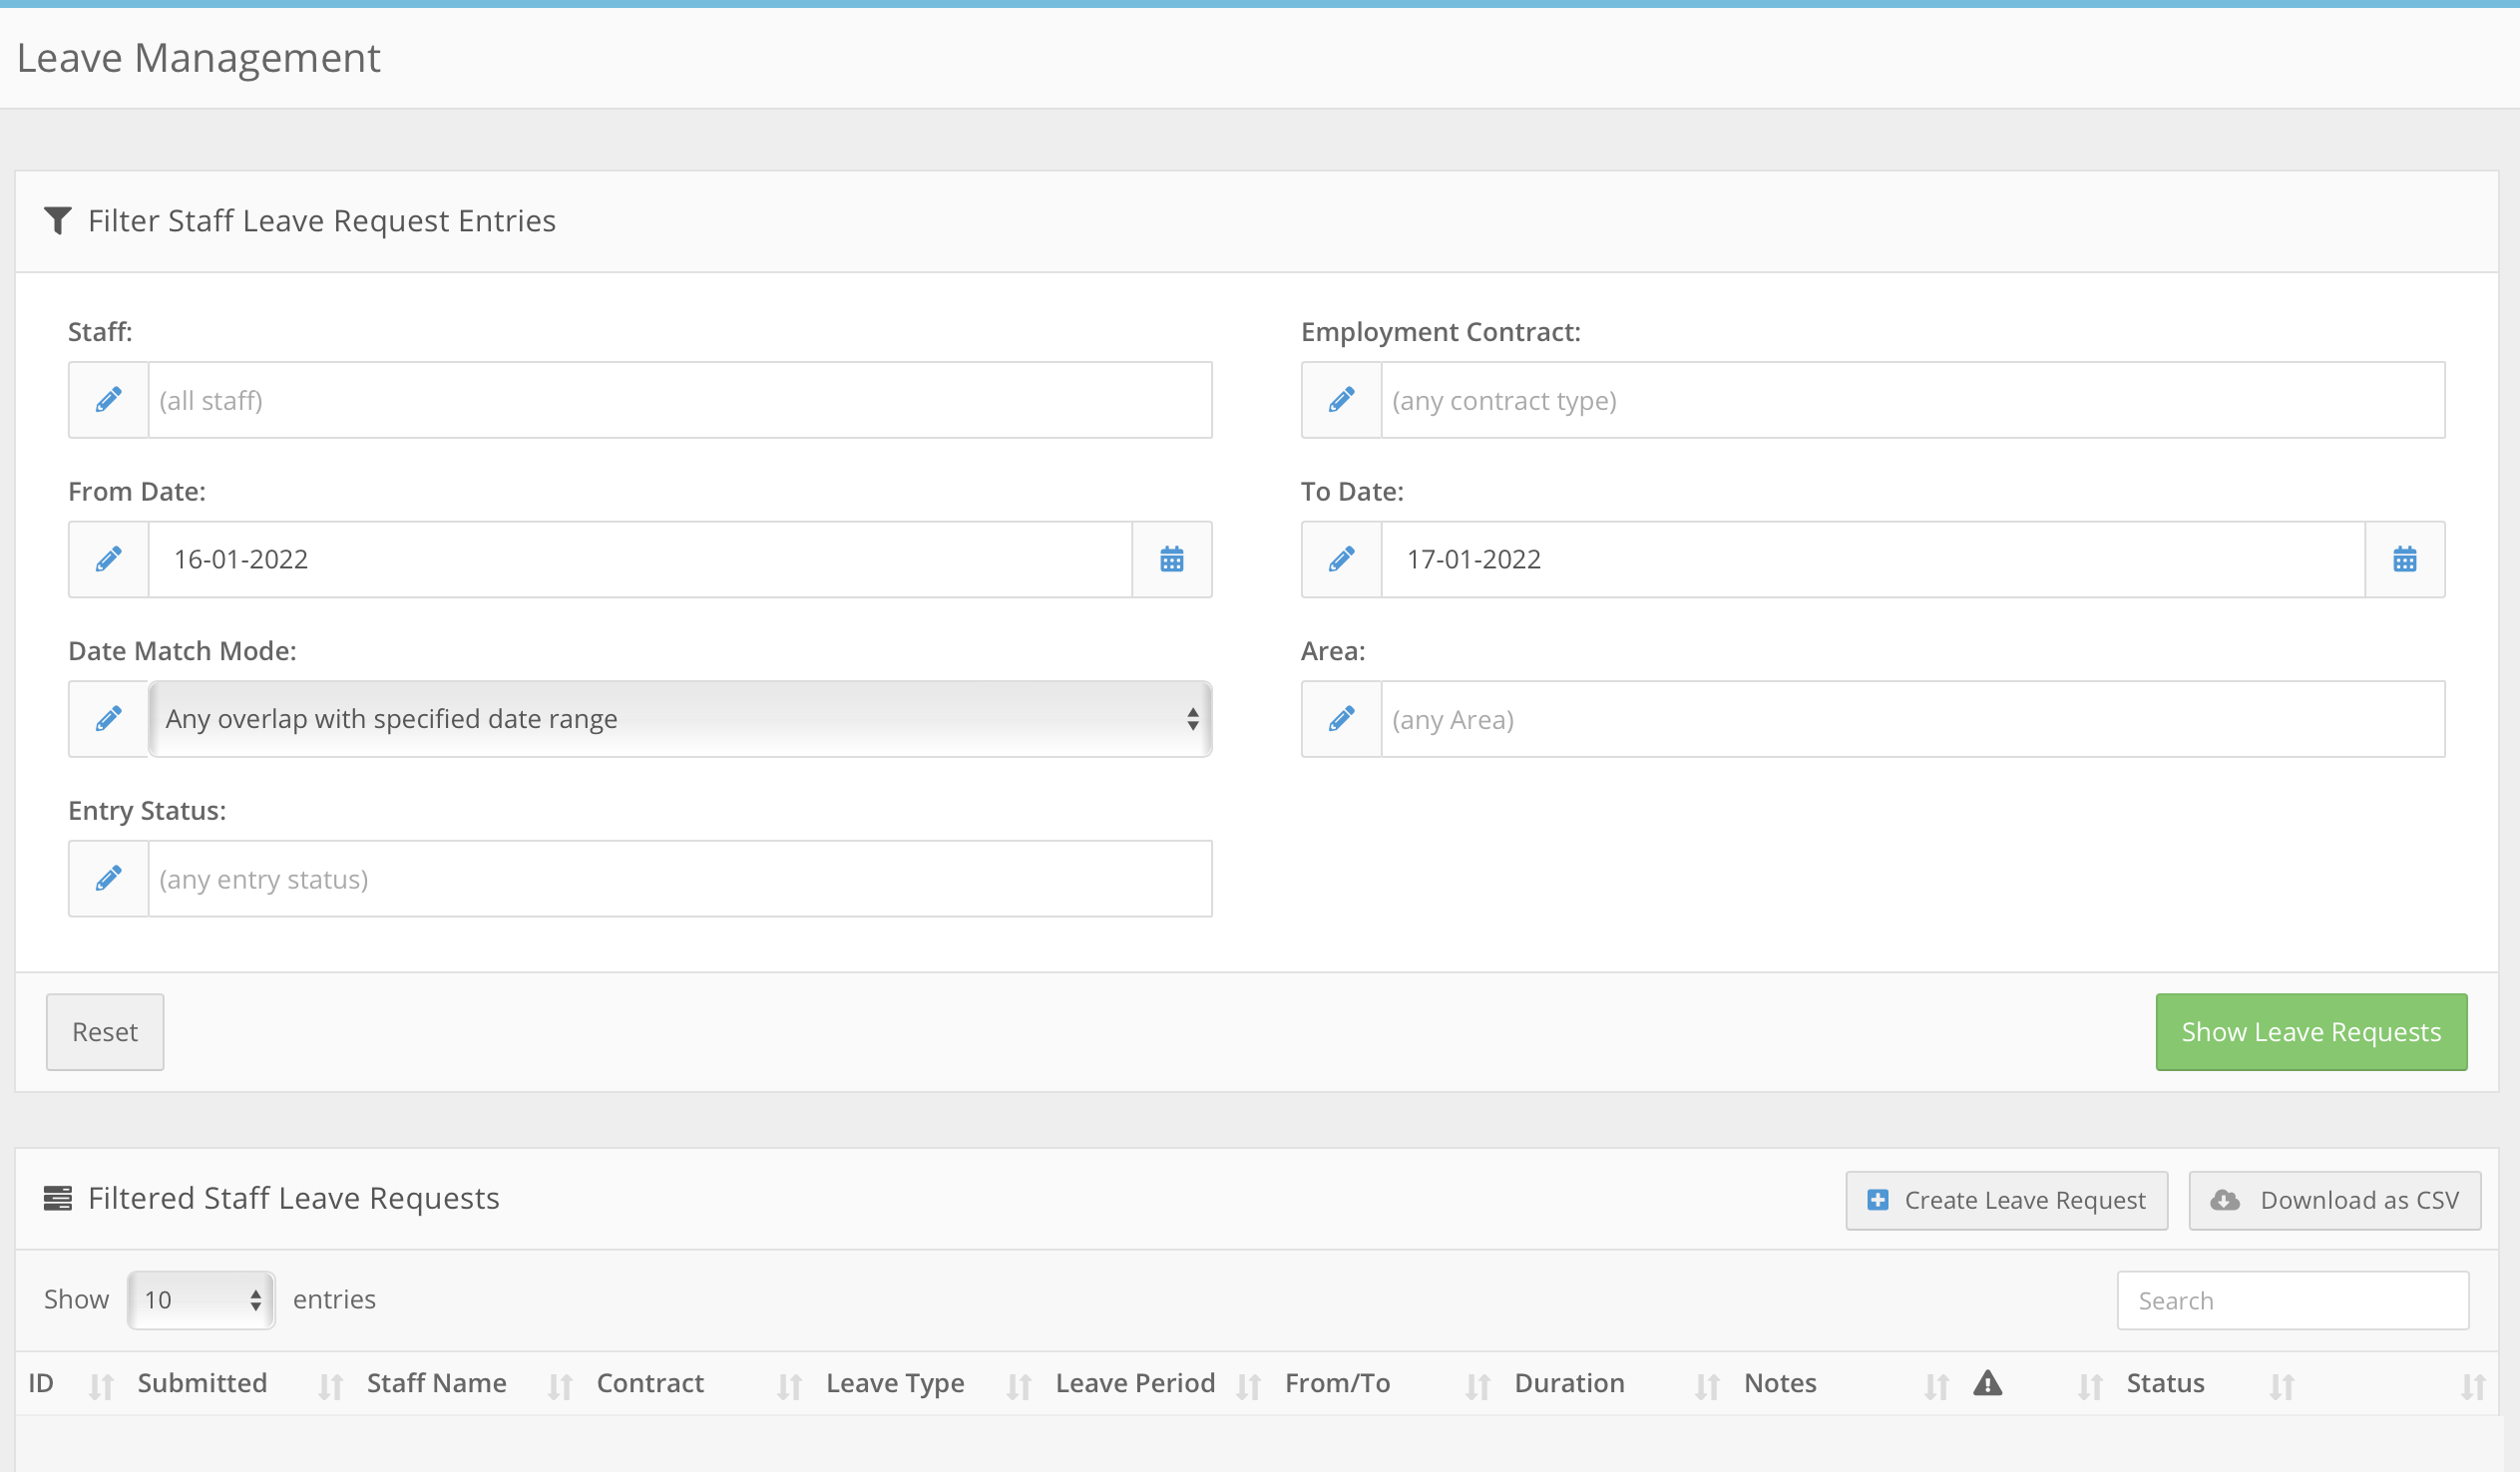
Staff
Filter for a specific staff member.
Employment Contract
Filter by employment type, e.g. full-time, part-time, casual.
From Date / To Date
Filter by the leave start and end dates, e.g. leave starting from 8 May and finishing by 23 May.
Date Match Mode
Controls how dates are matched: any overlap with the date range, first day falls within range, or last day falls within range.
Area
Filter for leave requests submitted for a specific area.
Entry Status
Filter by submission status: Sent, Pending, Approved, Declined, Returned, Cancelled, or Processed.
Leave Type & Warning State
Filter by the type of leave or whether warnings are present on a request.
These filters give you full control over what information is displayed.
Viewing Leave Requests
Below the filters, you will see a list of leave requests that match your search. Each request displays the following:
Submission date
Staff member
Contract
Leave type
Leave period
Start and end dates
Total duration
Staff notes
This gives a clear overview of current leave activity across the organisation.
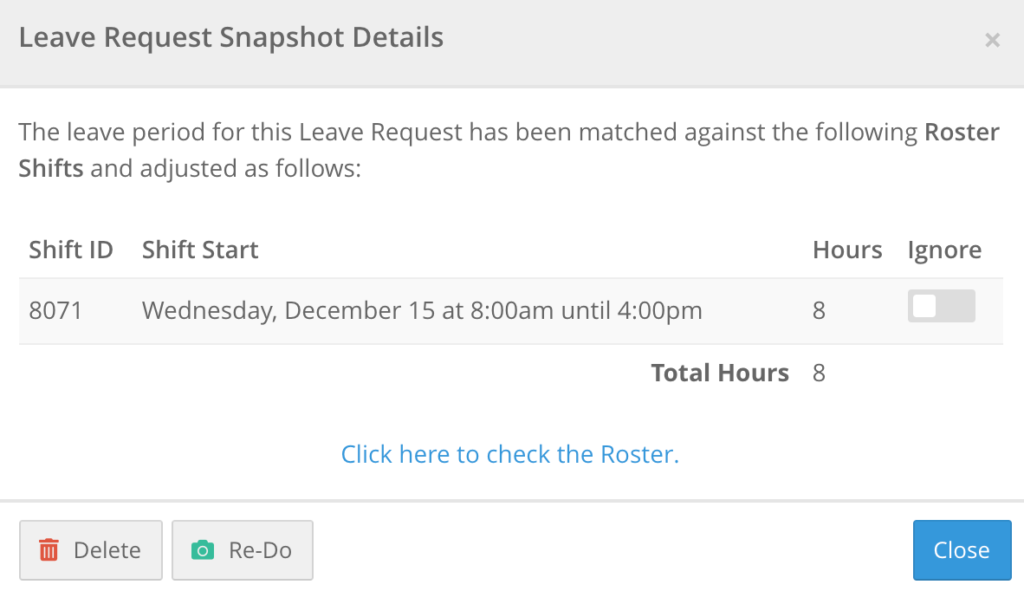
Leave Warnings and Conflicts
Warnings are displayed in red. Hover over a warning to view more details. Warnings help identify scheduling conflicts, overlapping shifts, and potential staffing issues, ensuring leave requests are reviewed carefully before approval.
To fix a conflict, open the leave request and navigate to the Roster Schedule Conflict Detected bar. Check the shift you would like to fix and click Fix Conflicting Shift. A confirmation pop-up will appear — click OK to confirm. The conflict bar will turn blue, and the button will change to Fixed once resolved.
The result of fixing a conflict may vary depending on your system settings. Contact your admin team or FlowLogic support if you are unsure.
Leave Status and Editing
On the right-hand side of each request you will see the status (Pending, Approved, Declined, or Cancelled) and an Edit option. Click Edit to open and update the leave request.
Additional Actions
From the main leave screen you can create a new leave request, export visible leave records as a CSV file, or use the search bar to find specific staff or leave types. These tools make managing large volumes of leave more efficient.
Editing a Leave Request
When editing a leave request you will enter the Leave Request Details page. Here you can view and update:
Leave Type
Managed through Leave Type Management settings. Can be changed if needed.
Leave Area
Identifies the staff member’s working location.
Attachments
Staff may upload documents such as medical certificates or supporting evidence for review during the approval process.
Leave Period
Indicates whether the request is a partial day, single day, or multiple days. Additional notes can be added to provide context.
Approval Status
Set to Pending, Approved, Declined, or Cancelled.
Notes & Documentation
Additional notes and supporting documentation can be added or reviewed here.
Approving Leave
Once any conflicts have been resolved, you can approve the leave. There are two ways to do this.
From the Leave Management screen, use the status dropdown directly on the leave request to change the status without opening the full record.
Alternatively, click Edit to open the leave request, scroll to the Leave Request Status section at the bottom of the page, and use the Update Status dropdown to select Approved. Then click Save & Close.
Setting Force New Snapshot on Save to Yes will take a fresh snapshot of the roster to recalculate the number of hours a staff member may be paid for the leave. This may not be applicable to all system configurations.
Approvals and Notifications
If a staff member has an assigned approving officer, the officer can be selected in the request and notifications will be sent as part of the approval workflow. This helps streamline the approval process.
Roster Check
You can select Force Snapshot to re-check the roster and identify any overlapping shifts. This ensures accurate leave and scheduling alignment before the request is finalised.
Audit and History
At the bottom of each leave record you will find last modified details, record history, and system logs. This provides transparency and creates a clear audit trail for payroll and HR.
Need help?
If you have any questions about Leave Management, reach out to your admin team or a FlowLogic support staff member for assistance.