How can we help?

Welcome to our Support Portal. Search for answers using the search box below,
or create a support ticket if you cannot find your answer.

< All Topics
Print

Roster Controls (Basic)

Roster Controls

The roster contains many different filtering options, navigation, and its own admin menu. These features have been broken into the 15 areas below.

1 . Roster Schedule Selector

The roster schedule selector allows you to filter the roster for shifts that have a specific schedule attached. Schedules can be utilized in several ways whether that’s, creating a schedule for a particular location, a particular type of support or for anything you would like to separate.

2 . Staff / Client Roster

This dropdown will allow you view the roster by staff names or by client names.

3. The Search Bar

The search bar provides the user with the ability to quickly search for a particular staff member or client depending on the view selected.

4. Filters

The filter tool will allow you to filter the roster based on shift area/site(s), staff member(s), client(s). The filter also gives you a few toggles to further refine the roster.

  • Hide Empty Rows

Toggling this will hide any staff/client rows that do not have any shifts for the period you are viewing

  • Combine Group Shifts

This will combine any group shifts into a single shift rather than having the shifts displayed separately (Examples below)


  • Include Archived Resources

By toggling this we can view any shifts for staff/clients that have been marked as “Archived”. These shifts will appear as a white shift and will allow you to either delete them or change the staff member on the shift.

5. User Display Preferences


The User Display Preferences allows the currently logged in user to customise the appearance of their Roster View. Options such as Minimal Colour, the options to hide specific extra information on the Shift bubble and the ability to adjust the font size allows the user to control what information they want to see on the default Roster view. Options selected are saved to the logged in User’s personal profile, allowing the same view to be seen the next time the user logs in to FlowLogic.

6. Guided Tour


Clicking the Guided Tour button will take the user through a guided tour of the Roster.

7. Navigation

Using the up and down arrows within the navigation buttons will allow you to go directly to the bottom of the roster or back to the top at the click of a button. Using the forward or back buttons will take you forward or back a week or fortnight depending on the view you are currently in.

8. Roster View


The roster view dropdown allows you to view the roster in either a weekly view or a fortnightly view.

9. Shift Overlap View

The Shift Overlay View switches the view to a resource selectable view that can quickly identify gaps in client and staff rostering.

10. Refresh Roster View


The Refresh button will prompt a refresh of the Roster data display.

11. Print Wizard


The Print Wizard will allow the user to select specific resources and options to create a PDF of the current roster view.

12. Deleted View

The Deleted View will switch the roster view to the Deleted Shifts view. *Coming Soon*
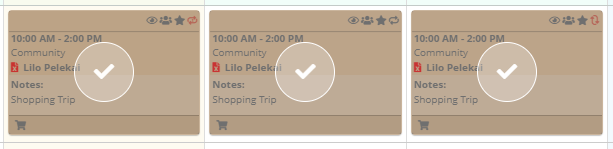
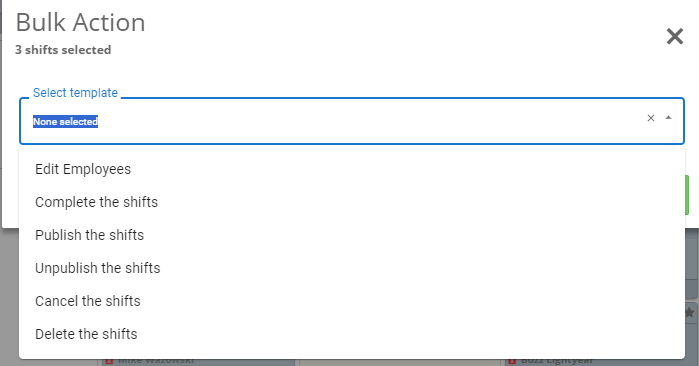
13. Multi-Select

The multi-select tool will allow you to perform bulk actions on as many shifts on the same week or fortnight that you are viewing. If you go to the next or previous period the shifts you have selected will be unselected.

To use this tool, you will first want to click on the hand icon.

MultiSelecttool

Next you can click on the shifts you would like to perform a bulk action on.

With the shifts selected you can then click on the lightning bolt where you will be presented with a pop up to select the bulk action you would like to do.

Once you have selected the bulk action, don’t forget to hit “Apply” to complete and process the above changes.

        14. Publish Schedule / Apply Template

Providers may roster several weeks in advance however they may not want these shifts to be viewable to all staff members. To prevent staff from seeing these shifts they can be marked as “Unpublished” on creation.

When you are ready to publish this schedule, we can utilize the “Publish Schedule” button to mark all of the shifts within the current view as “Published”.

If there is a set roster you typically have you can create a template and use the “Apply Template” tool to essentially copy and paste a particular roster.

To apply a template, you can click on the “Apply Template” button which will display a pop-up window with the option to select a particular template you have created and then apply said template.


Roster Administration

The roster administration menu has seven different sections. The admin menu can be broken into two parts, the first two options being staff / roster monitoring tools and the remaining being back-end user tools.

1. Clock-on/Off Status

The Clock-On/Off status tool will present you with a daily view of the roster with the clock-on/off status for the shifts. If a staff member has not clock on for a shift the shift will be red. Once the staff member has clocked on the bar will turn green. If a shift has passed without anyone clocking on or off the bar will be grey.

2. Roster Overview

The roster overview provides an in-depth breakdown of each staff members week or fortnight. At the top of the page there are a few filters/options as well as total overview for all published shifts. This is broken down into a few parts
including:

·         Worked (shifts that have passed)

·         Cancelled (short-notice or no-show)

·         Future (shifts still to occur that have not been cancelled)

The individual overviews are broken down further with the inclusion of leave hours.

If you are utilizing the contract system (covered in the Roster Resource section of this guide) it will also show how staff are tracking against their contracted hours. Staff displayed in red indicates either too few or too many hours, whereas staff displayed in green indicates that they have been rostered between their contracted and max hours per week as shown below.

3. Resources

Roster resources will allow you to control which staff / client(s) appear in the roster. When staff or client records are marked as “Archived” they will automatically be marked as “Archived” within the roster. If for example you have clients that did not receive direct support and are therefore not going to be rostered, you can manually mark their roster resource as “Archived” hiding them away from the roster. The same can be done for staff if you do not need certain staff member(s) displayed within the roster.

Within the “Roster Resources” you are also able to create a client resource which does not require a client record to be attached. This is handy for creating things such as training or team meeting

To switch between the “Staff” and “Client” resources you can click on the “Staff” dropdown as shown in the image below. 

In the above image there are four examples of resource modes. These behave in the following way:

1.       Active – The staff /client will appear in the roster

2.       Archived – The staff /client will not appear in the roster (Unless “Include Archived Resources” is toggled within the filters)

3.       Neither Active nor Archived – This will correspond with the inactive status of the associated staff or client record. When the resource is set like this it will not appear in the roster even if “Include Archived Resources” is toggled.

4.       Both Active and Archived – The staff / client will not appear in the roster even if “Include Archived Resources” is toggled. This status is never created by the system and can only be achieved by manually marking the resource as active and archived.


To create a new client resource, switch your resource view to “Client” and click the “Add Client Resource” button.

You can then give the resource a name and an area for the resource to be stored in.

4. Templates

Templates are Flowlogic’s handy tool to essentially copy and paste a preset roster. The template application process is simple: All shifts within the template reference period will be completely copied to the current view, starting from the earliest visible date.

See here for more information on Templates

5. Schedules

Schedules allow you to create alternate, refined roster views. Clicking the “Schedules” button in the roster administration menu will take you to the “Schedule Management” section. Here we can see existing schedules which can have their name edited or you can delete the schedule. In here we can also create a new schedule.

See here for more information on Schedules

6. Public Holidays

Within Flowlogic we can nominate public holidays, this will only affect staff pay and will have no affect on the billables for the shift. Public holidays can be applied two ways, the first being through the roster admin menu or through the shift itself (covered in the “Shift Creation” section of this guide.) These holidays will not carry forward to the next year so they
will need to be created for each year. Public holidays can be set up for how ever many years in advance you would like.

See here for more information on Public Holidays

7. Rogue Shift Report

The Rogue Shift report shows shifts that have been marked as Rogue – meaning Shifts that have been marked as “Ghost” when a rostered on Staff Member has been Archived, or Shifts that do not have an Active Staff Member Allocated.

Table of Contents