Welcome to our Support Portal. Search for answers using the search box below, or create a support ticket if you cannot find your answer.
Roster Layout
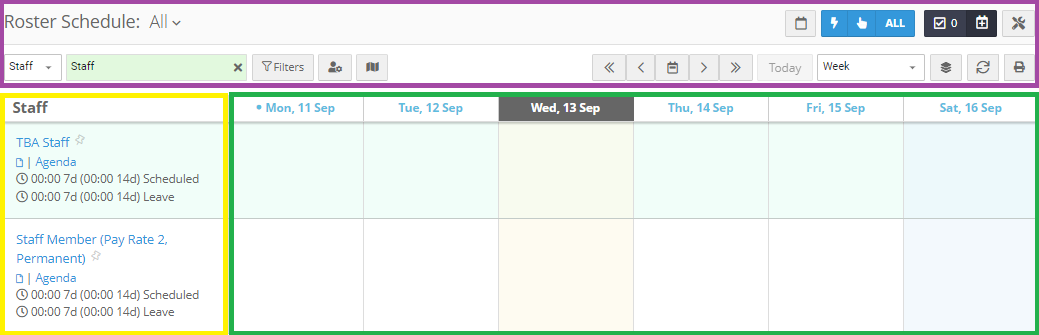
In the Purple box is the heading which contains.
– The Staff/Client dropdown which controls whether we want to view the roster with staff names or the client names on the right hand side.
– The Search Box enabling quick access to a specific Staff or Client’s Roster
– The Filter button which allows us to apply filters to the roster.
– The User Preferences section allowing the currently logged in user to customise the Roster view based on what they require.
– The Guided Tour that explains the functions of the Roster buttons.
– The Forward/Back buttons which allows us to jump forward or back a day/week/fortnight depending on the view we have selected.
– The “Today” button which allows us to jump to today’s date.
– The View dropdown which allows us to select a particular time frame we would like to view. This can be week or fortnight.
– The Overlap view, changing the view to the Daily or Weekly Overlap View
– The Refresh button which allows us to refresh the roster without having to refresh the entire page.
– The Print button which initiated the Print Wizard.
– The Admin buttons which will be covered below.
The Admin buttons consist of:
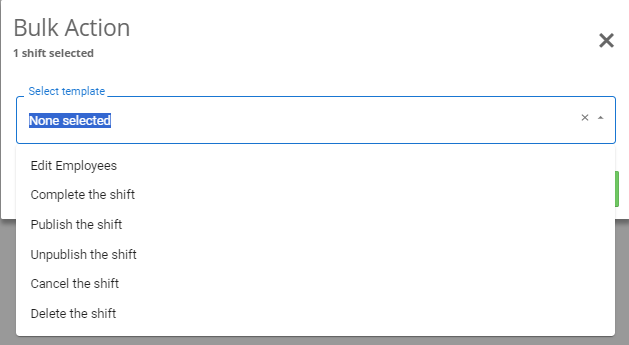
– The multi select and action hand.
o By clicking the hand we can select multiple shifts at once.
o Once we have selected one or more shifts we can then click the lightning bolt to perform a bulk action.
§ These actions include:
· “Edit Employees” which allows us to change the “Who’s Working” in Bulk.
· “Complete the shift” which allows us to mark the selected shifts as completed.
· “Publish the shift” which allows us to mark the selected shifts as “Published”.
· “Unpublish the shift” which allows us to mark the selected shifts as “Unpublished”.
· “Cancel the shift” which allows us to mark the selected shifts as cancelled.
· “Delete the shift” which allows us to delete the selected shifts.
– The “Publish Schedule” button which allows to publish all of the shifts in our current view.
– The “Apply Template” button which allows us to apply a template to our particular view.
– The “Administration” menu which contains the following:
o “Clock-On/Off Status” which provides us with the view of all the shifts for that day and a
status of whether or not a staff member has clocked on/off for their shift.
o “Roster Overview” which provides us with an overview of the roster for a particular time period
with information about, total time rostered, total time worked, total work
time remaining, total cancelled shifts and, the total time on leave.
o “Resources” which shows us the roster resources, this is also where we can mark a roster resource
as active or archived which will control whether they are shown on the roster
or not.
o “Templates” which is where we can add/edit/view templates in the system.
o “Schedules” which is where we can add/edit schedule
o “Public Holidays”
where we can add in public holidays which can affect pay rates when exporting.
In the Yellow
box is the roster resource list which will contain either staff names or client names depending on the view we have selected.
In the Green box we have the shifts themselves.